| Time Slip using Analog Record Player |
I have loved analog technology so far, but I began to feel something unnatural in listening to CD music only. I was interested in listening to analog records I experienced when I was young, but I hesitated by thinking that it would require considerable money. However, a friend recently brought SONY's intermediate class direct drive player (PS-4750), saying "I want you to repair it because the rotation of the record player is unstable." As a result of the repair, the rotation was stabilized by cleaning the volume which adjusts the rotation speed finely. After repairing it, I bought a few LP records of 100 yen per piece at the neighborhood recycling center and listened to the record with a semiconductor amplifier with a phono equalizer. The cartridge was an MM (Moving Magnet) type but the nostalgic sound that came out instantly made me slip time to 35 years ago. Even in the record of 100 yen it turned out that there was pretty good sound. I thought what kind of sound it would sound if I tried an MC (Moving Coil) cartridge with my vacuum tube amplifier, so I immediately searched for players and cartridges at the net auction. As a result, I was able to listen to the analog record playing sound with a cost of about 20,000 yen in total, so I will introduce the story hereafter.
Basic Concepts of Time Slip Project:
1. Since I am not so rich, the budget is limited to 30,000 yen in total.
2. I will use DENON's famous MC cartridge (DL-103) which I wanted long ago.
3. Since I can not buy an expensive step-up transformer for MC, I use the MC / MM equalizer amplifier board of the semiconductor amplifier on hand.
4. The record player is not a belt drive type but a direct drive which is not required for maintenance parts.
5. The MC / MM equalizer amplifier including the power supply unit is incorporated inside the player.
 It is DENON's direct drive player (DP-1600) purchased in the net auction with less than 10,000 yen.
Since it was made 35 years ago, there are some scratches, but the turn table rotation speed is stable.
It is DENON's direct drive player (DP-1600) purchased in the net auction with less than 10,000 yen.
Since it was made 35 years ago, there are some scratches, but the turn table rotation speed is stable.
When you put the mouse over the image, it will be enlarged.
(Same below)
 It is an arm and a cartridge. The arm is a static balance type, the needle pressure adjustment
range is 0 to 3 g and the overhang is 14 mm. An MM cartridge (AT-10G) of AUDIO TECHNICA is attached.
The rough specification of the player is as follows.
It is an arm and a cartridge. The arm is a static balance type, the needle pressure adjustment
range is 0 to 3 g and the overhang is 14 mm. An MM cartridge (AT-10G) of AUDIO TECHNICA is attached.
The rough specification of the player is as follows.
Drive system: Direct drive by AC servo motor
Rotation speed: 33 + 1/3 rpm, and 45 rpm
Speed adjustment range: ± 3% or more
Wow flutter: 0.018% wrms or less
S / N: 75 dB or more (DIN B)
Starting characteristics: Constant speed rotation within 1.5 seconds
 Interior with few things to see usually is poor, although it is an intermediate class machine.
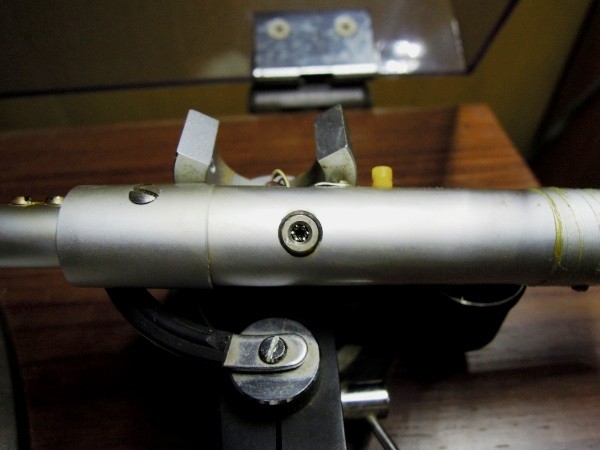
Unpainted veneer board is exposed. The shield cable to the amplifier is connected via the 5 pin
DIN jack at the bottom of the arm. The back lid is installed only on the right side motor part,
and the lower part of the arm is in an open state.
Interior with few things to see usually is poor, although it is an intermediate class machine.
Unpainted veneer board is exposed. The shield cable to the amplifier is connected via the 5 pin
DIN jack at the bottom of the arm. The back lid is installed only on the right side motor part,
and the lower part of the arm is in an open state.
 The purchased player was equipped with MM cartridge, but I would like to use the famous DENON's
MC cartridge DL-103. It is the cartridge of yearning of my school days which needs MC step-up
transformer or head amplifier, but I could not buy it with my student's pocket money. Finally I
bought DL-103 for less than 10,000 yen at the net auction, and it seems that the tip of the needle
is still beautiful so can be used for a while. Below are the specifications of DL-103.
The purchased player was equipped with MM cartridge, but I would like to use the famous DENON's
MC cartridge DL-103. It is the cartridge of yearning of my school days which needs MC step-up
transformer or head amplifier, but I could not buy it with my student's pocket money. Finally I
bought DL-103 for less than 10,000 yen at the net auction, and it seems that the tip of the needle
is still beautiful so can be used for a while. Below are the specifications of DL-103.
Output voltage: 0.3 mV
Left / right sensitivity difference: Within 1 dB
Left / right separation ratio: 25 dB or more
Impedance: 40 Ω
Needle tip radius: 16.5 micron
Needle pressure: 2 - 2.5 g
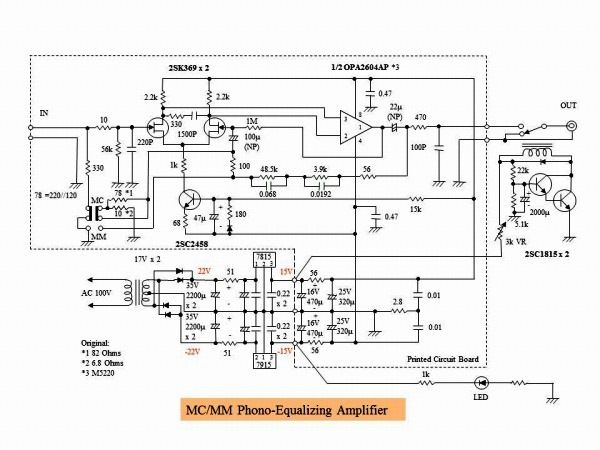 It is the circuit diagram of MC / MM equalizer amplifier. Amplifier board was removed from a semiconductor
integrated amplifier which I bought at a recycle shop, and the circuit diagram may be mistaken because I
read from the board. Although the operational amplifier was MITSUBISHI M5220, it was replaced with TEXAS
OPA2604AP for the purpose of lower noise. The power section of ± 15 V was made using scraps on hand.
In my case, since the gain of the MC equalizer amplifier is too high dew to the FET differential
preamplifier with a gain of 2.7 times, the resistance value of the NFB circuit was changed and the
gain was slightly lowered.
It is the circuit diagram of MC / MM equalizer amplifier. Amplifier board was removed from a semiconductor
integrated amplifier which I bought at a recycle shop, and the circuit diagram may be mistaken because I
read from the board. Although the operational amplifier was MITSUBISHI M5220, it was replaced with TEXAS
OPA2604AP for the purpose of lower noise. The power section of ± 15 V was made using scraps on hand.
In my case, since the gain of the MC equalizer amplifier is too high dew to the FET differential
preamplifier with a gain of 2.7 times, the resistance value of the NFB circuit was changed and the
gain was slightly lowered.
Since the naked gain is considerably high due to 2-stage amplification by 2SK369 and OPA2604AP, the
approximate gain in the vicinity of 1 kHz is calculated as 3.9 kΩ ÷ 88 Ω = 44 times in case of MM
and 3.9 kΩ ÷ 10 Ω = 390 times in case of MC. When turning the player's power on / off switch with
raised amplifier volume, a pop noise came out, so I installed a delay relay circuit at the output of
the equalizer amplifier. However, since the pop noise when power was turned off could not be removed,
the recovery time of the relay was shortened when the voltage at the relay operation was adjusted to
8 V by the volume of 3 kΩ. Finally, the pop noise problem at the time of power off was solved.
Since the relay is not activated when the equalizer amplifier is turned on, ignoring the voltage drop
of the 3 kΩ volume, the time required for the base voltage of 2SC1815 to become 1.4 V was calculated
to be 5.7 seconds. Actual relay start-up time fluctuates to 6 ± 1 seconds, which is in good consistent
with the calculated value.
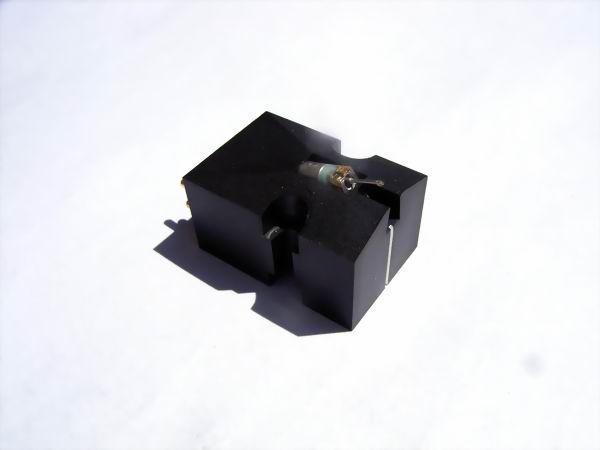
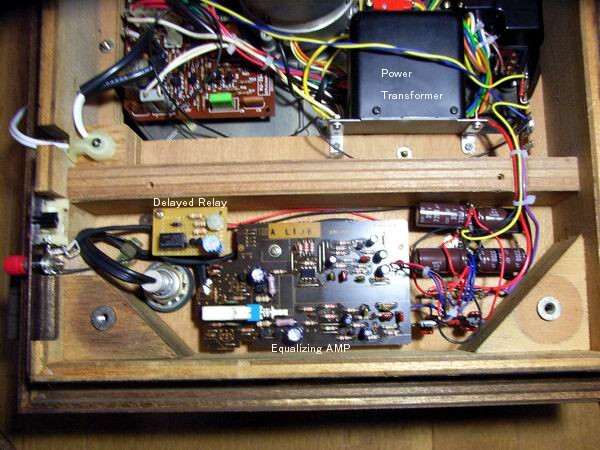
 These are the MC / MM equalizer amplifier and power supply unit incorporated inside the player. The
shield type power transformer was housed near the motor, and the rectifying / smoothing / voltage
stabilizing circuit, the equalizer amplifier, and the delay circuit were located at the bottom of arm.
These are the MC / MM equalizer amplifier and power supply unit incorporated inside the player. The
shield type power transformer was housed near the motor, and the rectifying / smoothing / voltage
stabilizing circuit, the equalizer amplifier, and the delay circuit were located at the bottom of arm.
 This is enlarged picture of the equalizer amplifier. On the lower left side, I installed RCA jack
for shielded cable to amplifier and terminal for earth wire. The white switch on the amplifier
board is the MC / MM changeover switch, but since it usually uses the MC cartridge, I put my hand
inside the player and switch to the MM side, when necessary.
This is enlarged picture of the equalizer amplifier. On the lower left side, I installed RCA jack
for shielded cable to amplifier and terminal for earth wire. The white switch on the amplifier
board is the MC / MM changeover switch, but since it usually uses the MC cartridge, I put my hand
inside the player and switch to the MM side, when necessary.
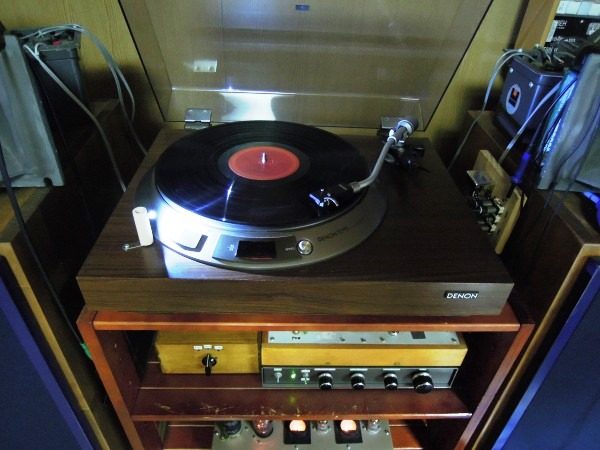 It is the front of the player after remodeling. I installed a high-intensity LED lamp to improve
player operability and atmosphere in the dark room. After buying cylindrical wood with a length
of 20 cm at the home center and cutting it to 5 cm, I just fixed the neutral lamp for the bike
inside and fixed it with L bracket.
It is the front of the player after remodeling. I installed a high-intensity LED lamp to improve
player operability and atmosphere in the dark room. After buying cylindrical wood with a length
of 20 cm at the home center and cutting it to 5 cm, I just fixed the neutral lamp for the bike
inside and fixed it with L bracket.
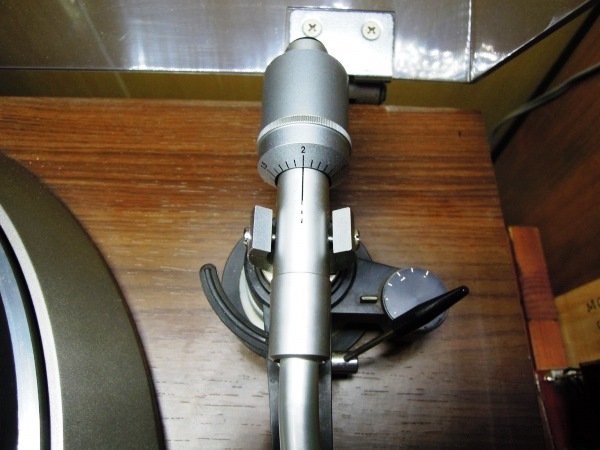 It is the bearing part of the tone arm. Although it has an oil dump lifter and anti skating
mechanism, I think that the arm is inexpensive and popular version without any model number.
The horizontally rotating ball bearing rotates smoothly, but as for the vertical bearing part,
if twisting the arm pipe left and right it has a little instability. I do not think that this
instability causes immediate tracing failure but decided to repair as it is not feeling good
It is the bearing part of the tone arm. Although it has an oil dump lifter and anti skating
mechanism, I think that the arm is inexpensive and popular version without any model number.
The horizontally rotating ball bearing rotates smoothly, but as for the vertical bearing part,
if twisting the arm pipe left and right it has a little instability. I do not think that this
instability causes immediate tracing failure but decided to repair as it is not feeling good
 The bearing in the vertical part is tightened with two screws from each side. To relax it, a
U-shaped jack driver is required. When I looked it up on the net, I found out that a jack driver
named ENGINEER 's DJ-03 was available. The U-shaped part has an inner dimension of 4 mm, an
outer dimension of 7.5 mm, and a blade thickness of 0.7 mm. It was the best if there was
something with inside dimension 3 mm, but it was possible to turn the fastening screw at 4 mm.
The price was cheap at around 500 yen including postage.
The bearing in the vertical part is tightened with two screws from each side. To relax it, a
U-shaped jack driver is required. When I looked it up on the net, I found out that a jack driver
named ENGINEER 's DJ-03 was available. The U-shaped part has an inner dimension of 4 mm, an
outer dimension of 7.5 mm, and a blade thickness of 0.7 mm. It was the best if there was
something with inside dimension 3 mm, but it was possible to turn the fastening screw at 4 mm.
The price was cheap at around 500 yen including postage.
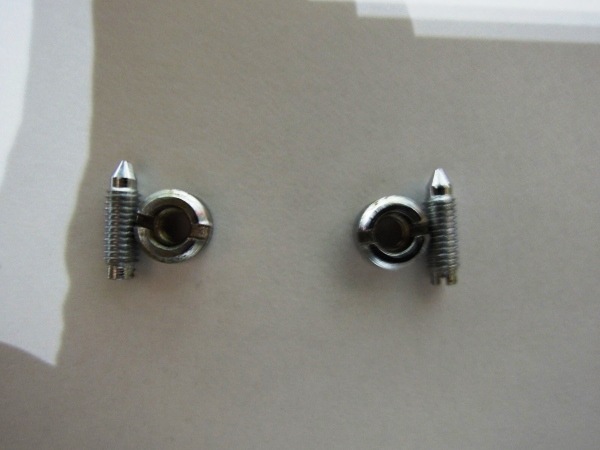 It is the screw removed using jack driver and precision screwdriver. After washing with thinner,
it was gently applied with oil.
It is the screw removed using jack driver and precision screwdriver. After washing with thinner,
it was gently applied with oil.
 It is the ball bearing of the vertical rotating part after removing the screw. Fortunately the
rubber fixing ball bearings was not deteriorated and only cleaning and lubrication to the bearing
were done. The cause of the instability is presumed that the rubber was condensed firmly over
time and a slight gap was formed between the screw tip and the bearing.
As a result of tightening screws with moderate strength from both sides, the instability of
the arm is completely disappeared. It feels like playing sound improves and recording noise
also seems to be small. In addition, the sensitivity test of the arm was carried out. After
taking zero balance and making the arm horizontal, when I increase or decrease the needle
pressure by 0.2 g, the arm clearly moves up and down. If it is 0.1 g, the arm becomes unstable
and the reaction is dull. From these results, it seems that the stylus pressure of 1.0 g can be
sufficiently used.
It is the ball bearing of the vertical rotating part after removing the screw. Fortunately the
rubber fixing ball bearings was not deteriorated and only cleaning and lubrication to the bearing
were done. The cause of the instability is presumed that the rubber was condensed firmly over
time and a slight gap was formed between the screw tip and the bearing.
As a result of tightening screws with moderate strength from both sides, the instability of
the arm is completely disappeared. It feels like playing sound improves and recording noise
also seems to be small. In addition, the sensitivity test of the arm was carried out. After
taking zero balance and making the arm horizontal, when I increase or decrease the needle
pressure by 0.2 g, the arm clearly moves up and down. If it is 0.1 g, the arm becomes unstable
and the reaction is dull. From these results, it seems that the stylus pressure of 1.0 g can be
sufficiently used.
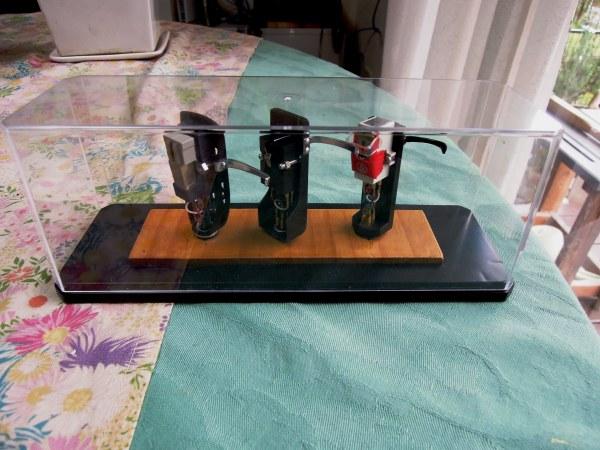 It is a handmade cartridge keeper. I opened the three holes and embedded the wood board painted
with varnish at the bottom of the plastic display case I bought at 100 yen shop. I opened a hole
with a diameter of 8 mm with a drill and then made a slit with a width of 2 mm to fix the
cartridge. Since the plate was too thick and the cartridge hits the ceiling, I opened a
rectangular hole in the bottom of the case and embedded it. The cartridges are MM cartridge
made by PIONEER of unknown type, MC cartridge DL-103 of DENON, MM cartridge AT-10G made by
AUDIO TECHNICA, from the left. In addition, since the needle of AT-10G was old, I purchased
a red replacement needle for about 3,000 yen and replaced it.
It is a handmade cartridge keeper. I opened the three holes and embedded the wood board painted
with varnish at the bottom of the plastic display case I bought at 100 yen shop. I opened a hole
with a diameter of 8 mm with a drill and then made a slit with a width of 2 mm to fix the
cartridge. Since the plate was too thick and the cartridge hits the ceiling, I opened a
rectangular hole in the bottom of the case and embedded it. The cartridges are MM cartridge
made by PIONEER of unknown type, MC cartridge DL-103 of DENON, MM cartridge AT-10G made by
AUDIO TECHNICA, from the left. In addition, since the needle of AT-10G was old, I purchased
a red replacement needle for about 3,000 yen and replaced it.
 It is an example of my favorite LP records which I bought for 100 yen each at the neighborhood
recycling center. There are also old jackets, but LP records themselves are not so damaged and
there is little noise. Since I have only 30 records in all, I decided to go to the recycling
center sometimes to find a bargain.
It is an example of my favorite LP records which I bought for 100 yen each at the neighborhood
recycling center. There are also old jackets, but LP records themselves are not so damaged and
there is little noise. Since I have only 30 records in all, I decided to go to the recycling
center sometimes to find a bargain.
Impressions after hearing the sound of analog record after 35 years:
1. In old and bad conditioned records I hear some noise, but can hardly hear it at a good
quality record.
2. Compared with CD, the sound is soft and has reverberation. Especially the sound of the
cymbal and triangle sounds are floating up.
3. In quiet songs such as classical music, the CD sound will win, but in lively music such
as jazz and pops, the record sound will beat on CD.
4. If I spend hundreds of thousand yen on the player, cartridge, and equalizer amplifier, I
will get better sound but I can enjoy a certain level of sound with an investment of 20 to 30
thousand yen.
5. There is something that can be used quite well even for a cheap record that I bought for
100 yen. Even records sold at record shops in one or two thousand yen can be bought from 50
to 100 yen at the recycling center near the garbage incineration place. In other words, it is
a treasure to those who need it even for garbage. What place ? ・・・secret!
6. Even if the pop sound is generated when the equalizer amplifier is turned on / off, it can
be solved by a simple delay circuit.
7. I want an automatic arm lifter. When I fall asleep while listening to comfortable music,
there is occasion that the motor of record player is continuously rotating at the record end
point when I noticed. Although there is a post-attachment automatic lifter, I am thinking
whether it can manage somehow manually because it makes close to 10,000 yen at the net auction.
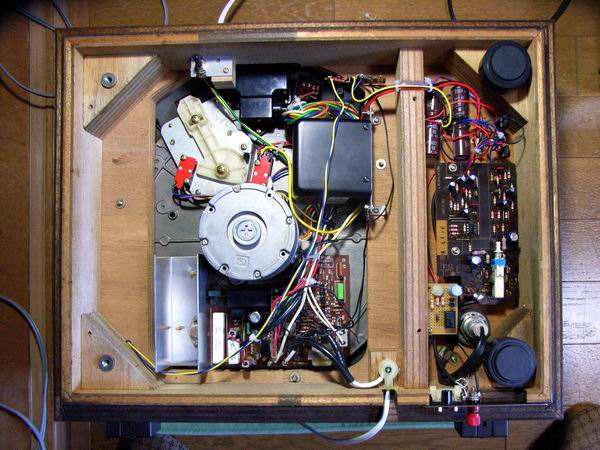
Subsequent remodeling: Addition of auto stop function
Because the DP-1600 is a manual machine, it has a manual lift up & down function of the tone arm,
but the turntable keeps turning when the record performance is over. When I fell asleep while
listening to pleasant music I thought that I wanted to do something because the life of the needle
would be shortened. It is best if the arm automatically lifts up at the record end and the motor
turns off, but adding the lift up function seems quite tough. There is also a product (AT6006a of
AUDIO TECHNICA) that lifts up the arm mechanically after retrofitting, but it is useless because
it will be over 10,000 yen at the net auction.
Therefore, I tried making a prototype device that automatically stops the motor using photosensor.
There is a problem when putting it to leave for a few days to keep the needle stationary while
getting down on the record board, but at least as the worry that the needle will wear out will be
eliminated. With this, I can relax and listen to music without having to rush and go running to
the player when the record ends. More than anything, it is a good point that the cost of parts
newly purchased is only 1,000 yen or less.
 It is a photo sensor purchased for 1,100 yen including postage in the net auction. The OMRON
EE-SX914-R transmissive sensor has an output terminal that turns on or off the transistor when
closing the U-shaped groove, I can stop the motor automatically by connecting a relay therein.
The maximum control current of the output terminal is 50 mA, the width of the U-shaped groove
is 5 mm, and the depth is 6.5 mm.
The sensor has a 1 m long cord and there is a light entering indicator light that shines in
orange. Besides this, a reflective sensor is also considered but I decided to use a transmissive
sensor because there is not enough space to install the sensor behind the balance weight of
the arm.
It is a photo sensor purchased for 1,100 yen including postage in the net auction. The OMRON
EE-SX914-R transmissive sensor has an output terminal that turns on or off the transistor when
closing the U-shaped groove, I can stop the motor automatically by connecting a relay therein.
The maximum control current of the output terminal is 50 mA, the width of the U-shaped groove
is 5 mm, and the depth is 6.5 mm.
The sensor has a 1 m long cord and there is a light entering indicator light that shines in
orange. Besides this, a reflective sensor is also considered but I decided to use a transmissive
sensor because there is not enough space to install the sensor behind the balance weight of
the arm.
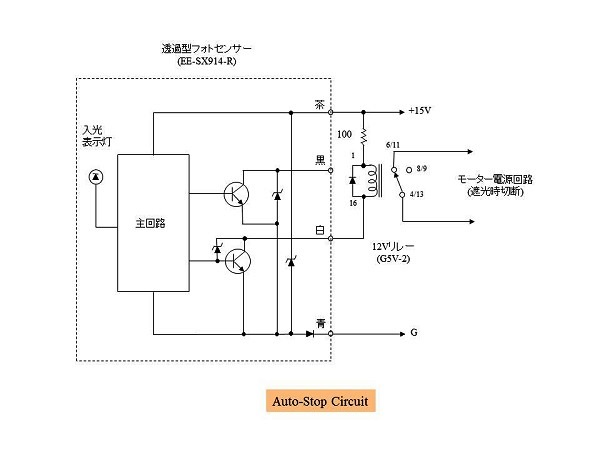 It is the circuit diagram of the auto-stop device. My player has built-in equalizer amplifier,
so + 15V is taken out from the amplifier power supply. There are two kinds of output terminals
on the photosensor, the black terminal turns on when the sensor light is received, and the white
terminal is on when the sensor light is blocked. I connected the 12V relay to the white terminal
and turned off the motor when sensor light was blocked.
When the tone arm is returned to its original position, the relay is restored and the motor
starts to rotate. A 100 Ω resistor was inserted so that the voltage across the relay and the
maximum control current of the sensor did not exceed the rating. If I turn off the main power
of the player with relay contacts, I will also disconnect + 15 V, the relay will recover and
the motor will rotate again, so I tried to turn on / off by the relay only the wiring to the
motor from the secondary of main power switch.
It is the circuit diagram of the auto-stop device. My player has built-in equalizer amplifier,
so + 15V is taken out from the amplifier power supply. There are two kinds of output terminals
on the photosensor, the black terminal turns on when the sensor light is received, and the white
terminal is on when the sensor light is blocked. I connected the 12V relay to the white terminal
and turned off the motor when sensor light was blocked.
When the tone arm is returned to its original position, the relay is restored and the motor
starts to rotate. A 100 Ω resistor was inserted so that the voltage across the relay and the
maximum control current of the sensor did not exceed the rating. If I turn off the main power
of the player with relay contacts, I will also disconnect + 15 V, the relay will recover and
the motor will rotate again, so I tried to turn on / off by the relay only the wiring to the
motor from the secondary of main power switch.
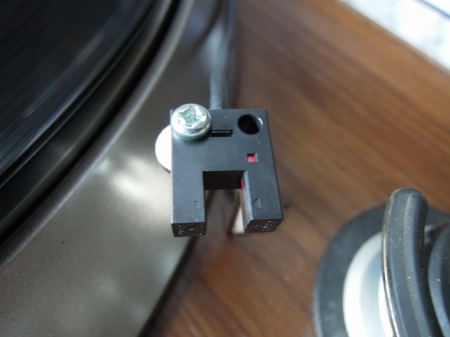
 The copper foil tape affixed to the tone arm operates the sensor by closing the groove of
the photosensor when the record performance ends. I studied whether it can be attached behind
the fulcrum of the arm, but since there is no place to install the sensor, I attached it to
the front inevitably. The copper foil tape is very light so it will not give mechanical
stress to the arm.
Since the photosensor's groove width and depth are narrow, and the size of the copper foil
tape to be blocked is limited, I got considerably nervous to fix the photosensor (height
and horizontal position) in order to automatically stop at the end of record performance.
Finally, using a Z-shaped stainless angle with a height of 30 mm, I fixed it with screws.
Although it does not look so good, there is an advantage that I can make it back to the original
at any time dew to very simple structure.
The copper foil tape affixed to the tone arm operates the sensor by closing the groove of
the photosensor when the record performance ends. I studied whether it can be attached behind
the fulcrum of the arm, but since there is no place to install the sensor, I attached it to
the front inevitably. The copper foil tape is very light so it will not give mechanical
stress to the arm.
Since the photosensor's groove width and depth are narrow, and the size of the copper foil
tape to be blocked is limited, I got considerably nervous to fix the photosensor (height
and horizontal position) in order to automatically stop at the end of record performance.
Finally, using a Z-shaped stainless angle with a height of 30 mm, I fixed it with screws.
Although it does not look so good, there is an advantage that I can make it back to the original
at any time dew to very simple structure.